Automations
While working on the GUI cleanup, I got side tracked and ended up playing with some automations. Specifically, I made some automations for the Ikea Tradfri lights that live in the two bedside lamps in my bedroom. The final implementation resulted in being able to set different scenes via voice control with the help of the Google Home Mini and IFTTT (IF This Then That), but this happened over several iterations which I’ll walk through first.
Iteration 1 – turning lights on and off with services
I don’t have a lot of experience with JSON, but that’s the format the the developer Services uses to pass in information. The first thing I wanted to be able to do was the just turn the lamps on and off. In the Ikea app, I made grouped the two lamps (kyles_lamp and mels_lamp) into a group called bedroom_lamp. Because you can group different kinda of bulbs into the same group, you can’t control every feature of the individual bulbs from the group entity. We’ll focus more on that after, but for now we should be able to turn both lamps on and off from the services window under Developer Tools:
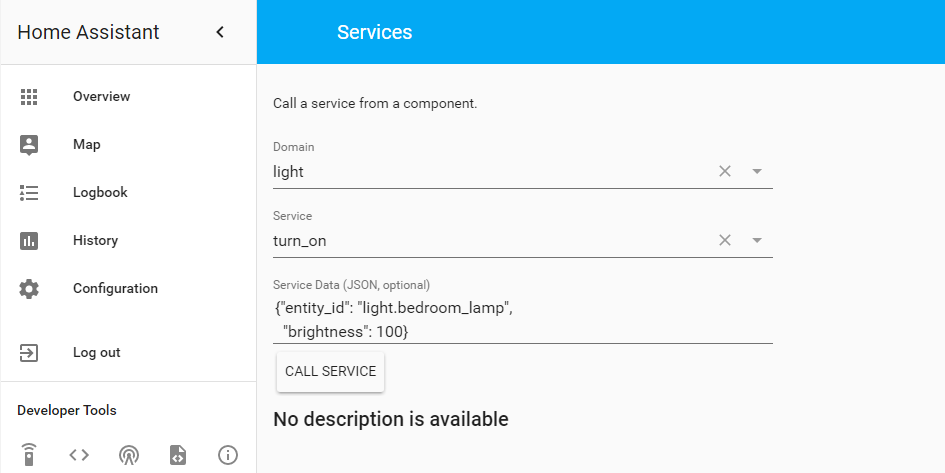
This is a super handy feature to test out features. Here I’m telling HA to send the action “light.turn_on” to the entity “light.bedroom_lamp” and adjust the brightness to 100 (a value between 0 and 255). This SHOULD work, but for some reason it does not, or at least not as of version 0.58.1. I know that the formatting is correct, because I can change “bedroom_lamp” to “kyles_lamp” and the light turns on with the given brightness as expected. I don’t know exactly why the first version doesn’t work, but it was an extremely painful realization to come to since I was still not very comfortable with the JSON formatting. I suspect the issue is related to the grouping of the bulbs from the Ikea app, or at least how HA deals with it. For now, we can either call the two lamps separately, or find another way to call both lights.
My end goal is to turn these lamps on at a specified brightness (and ideally warmth) via voice command. To do this, we need to use IFTTT unfortunately. I say unfortunately not because I don’t like IFTTT (it is an amazing service), but because this method takes away local control. With IFTTT, I issue a voice command to Google Assistant, which relays it to IFTTT, which sends back a command to HA. In reality, Google Assistant already takes away that local aspect, but this just adds another layer and another delay. In the future I may try out Snips to keep everything local, but for now the Home Mini is the path of least resistance.
Anyway, that was a long winded way of saying we’ll be using IFTTT services to communicate between HA and Google Assistant, and to do that we need to be able to send our commands through JSON just like in the Services Developer tool. So unless I want to issue individual commands for each lamp, I need to find another way.
This other way turns out to be fairly painless either an automation or a scene. I ended up using both, but first step was with an automation and an input slider.
The input slider is created with the following code in the configuration.yaml file:
input_number:
lamp_brightness:
name: Bedroom Lamps Brightness
initial: 0
min: 0
max: 255
step: 5
The component name for this slider is actually “input_number”. We define a name for HA to refer to it as, a name for the GUI, an initial state for when HA first starts, the min and max value for the slider, and the minimum step size that we can take to go between the min and max.
Now to tie this slider to the actual lamps, we need a new automation:
- id: lamp_brightness_dimmer
alias: "Change Lamp Brightness"
trigger:
platform: state
entity_id: input_number.lamp_brightness
action:
- service: light.turn_on
data_template:
entity_id: light.bedroom_lamp
brightness: '{{ states.input_number.lamp_brightness.state | int}}'
The automation is really three main parts, the trigger, the conditions, and the action. We don’t have conditions here, so we’ll cover them in another post. In this case, our trigger in whenever the slider changes state and the action is to set the brightness based on the new position of the slider.
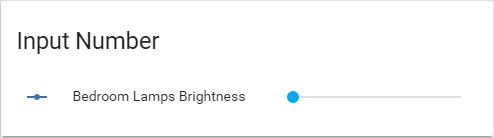
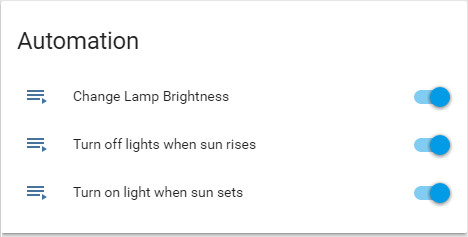
When we restart HA, we’re greeted with 1 new windows in our GUI and a new line in our automations window:
Now when you move the slider, the lamp should turn on if it wasn’t already, and change brightness in accordance with the position of the slider. That’s all well and good, but the goal we were trying to get to was to change the brightness from the Services Tool:
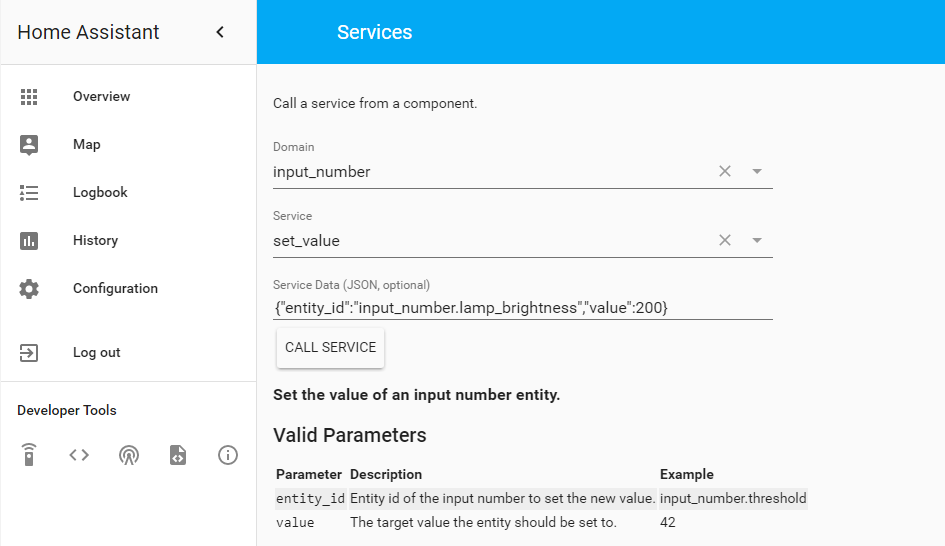
Great! Our slider got set to 200 and the light reacted accordingly.
Iteration 2 – smooth transitions and an intuitive interface
The main gripe I have with the solution above is that going from a brightness of 100 to 200 is jarring. When changing brightness from the Ikea app, there is a smooth transition that is really nice. We can replicate that in HA by adding a line to the automation. All of the available attributes are listed on the components page, like in this case the lights component points us in the right direction.
We’ll add one line to the automation so that any adjustment to the slider results in a smooth transition between values. You just need to set the time frame you’d like to see the transition happen over. In this case, I used 1 second with good results.
- id: lamp_brightness_dimmer
alias: "Change Lamp Brightness"
trigger:
platform: state
entity_id: input_number.lamp_brightness
action:
- service: light.turn_on
data_template:
entity_id: light.bedroom_lamp
brightness: '{{ states.input_number.lamp_brightness.state | int}}'
transition: 1
The other problem I have with this isn’t super obvious right now, but once we start controller this with Google Assistant it will be more apparent. The input value for the brightness must be between 0 and 255. When I give a command, I don’t want to have to remember to say “Set brightness to 255” for full brightness, and I certainly wouldn’t expect anyone else to remember that either. To fix this, we just need to change two things.
One, instead of changing the “brightness” attribute of the light, we can use the “brightness_pct”, which is the brightness as a percentage:
- id: lamp_brightness_dimmer
alias: "Change Lamp Brightness"
trigger:
platform: state
entity_id: input_number.lamp_brightness
action:
- service: light.turn_on
data_template:
entity_id: light.bedroom_lamp
brightness_pct: '{{ states.input_number.lamp_brightness.state | int}}'
transition: 1
We also now have to change the slider accordingly:
input_number:
lamp_brightness:
name: Bedroom Lamps Brightness
initial: 0
min: 0
max: 100
step: 5
And that’s that. We can now set up our voice control aspect to accept inputs in terms of percentages which is much more natural.
However, before we go and do that, we need to work through how we plan to use these voice commands. The last thing you want to do is to write an applet for every single scenario possible. Luckily IFTTT gives a fair bit of flexibility in terms of setting up your applets. You can set up an applet to accept a simple phrase, a phrase with a numerical variable, a phrase with a string variable, or a phrase with both a string and a numerical variable. For example, you could write an applet that accepts “Set the bedroom lamp to 50 percent” and another for 100 and another for 25. Or, you could instead write a phrase with a numerical variable like “Set the bedroom lamp to # percent” and you can set the brightness anywhere between 0 and 100 percent with a single applet.
IFTTT
We’re now ready to tie everything together with IFTTT. This requires a few steps:
- Secure HA with a password
- Set up a dynamics DNS service (unless you have a static external IP)
- Forward a port to your HA instance
- Set up IFTTT
These steps are more involved than I wanted to get in this blog post, so I’m going to skip over steps 2 and 3 for now as they’ll be covered in more depth in later posts. Once those posts are written, they’ll be linked to above.
Secure HA
In the configuration.yaml file, there is a commented out line that you need to un-comment:

This sets a password to get into the HA GUI, but doesn’t actually define the password. It instead points to the variable “http_password” in the secrets.yaml file. By default this is set to “Welcome”, make sure to change it to something long in case some bots stumble across your IP address and forwarded port somehow. Again, this is the bare minimum amount of of security you should have on an externally facing site, I’ll be posting more on this later and linking to it here.
IFTTT Setup
- Create a free account, easiest to just link your Google account.
- Link your Google account if you didn’t use Google to create your account above.
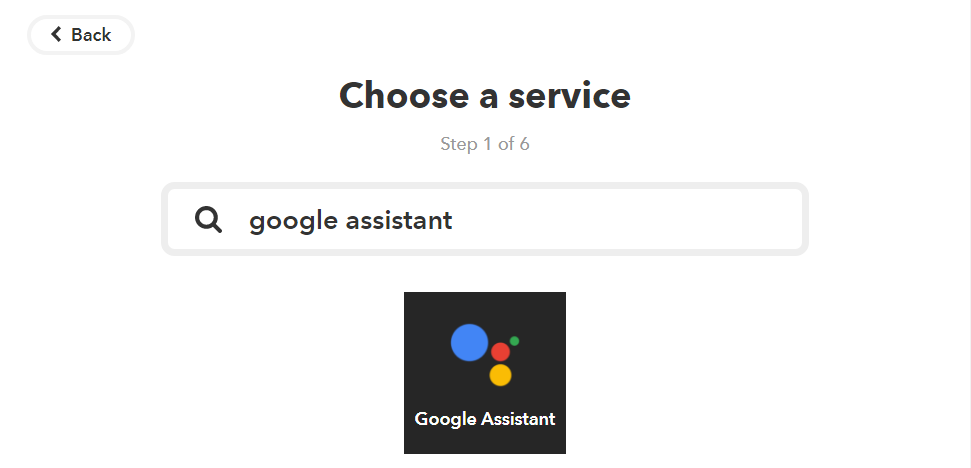
- Create an Applet:
Click “this”

Search for “Google Assistant”
Choose “Say a phrase with a number”
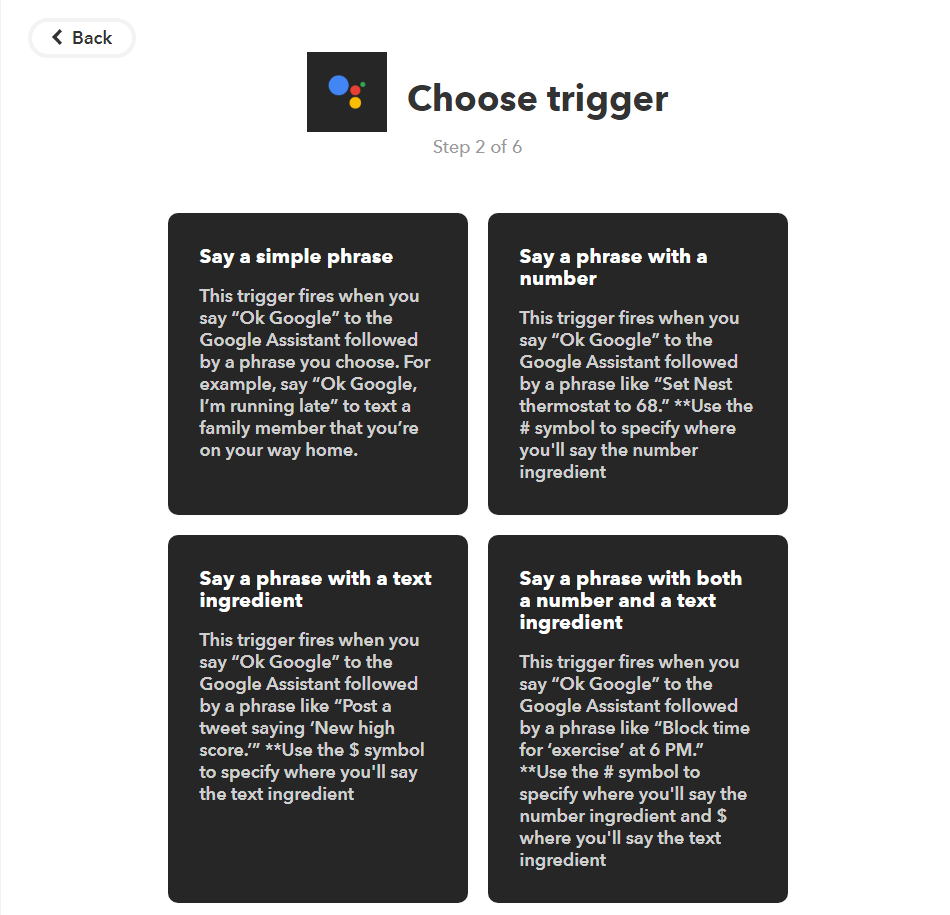
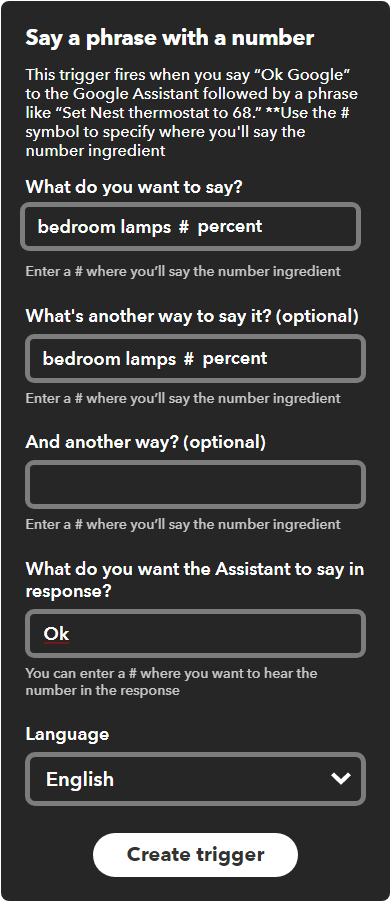
This is kind of a pain, but because Google Assistant treats Philips Hue Lights as first class citizens, if we try to use a phrase that’s tied to that system, we’ll get an error. For example, if we use the phrase “Set the bedroom lamps to # percent.”, as soon as Google Assistant hears “Set _____ percent” it looks for a light in the Google Home app and doesn’t send the command to IFTTT. To circumvent that, we need to choose our phrases as to not over lap with predefined phrases. A list of most pre-defined phrases can be found here. For now, we’ll have to be a little blunt with Google Assistant for your trigger. Pick anything or nothing for it’s response back to you:
Now select the action – the “that”:

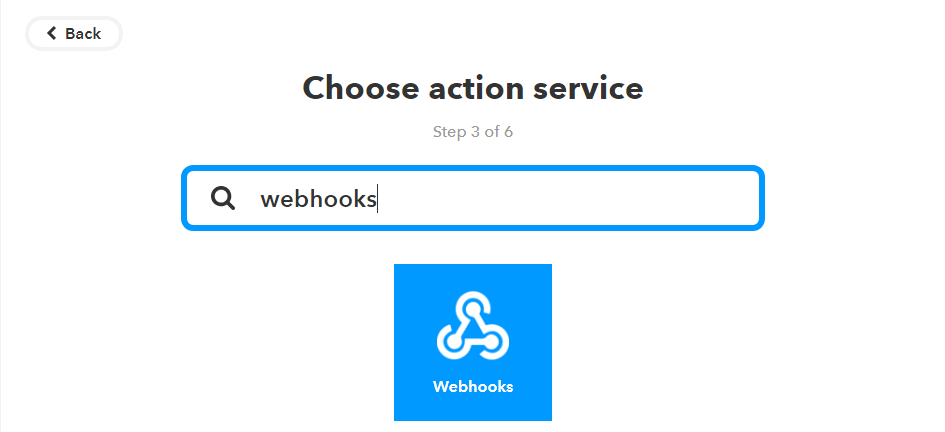
Search for and select “Webhooks” so that we can interface with HA:
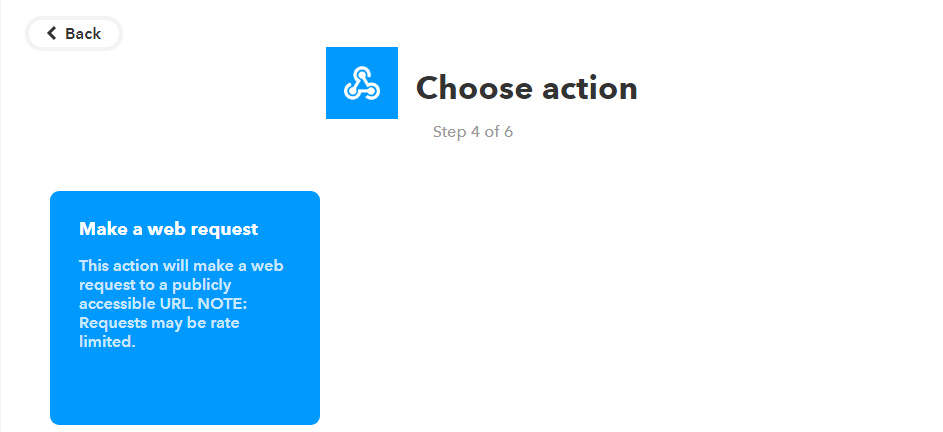
At the time of writing this, there is only one option: “Make a web request”:
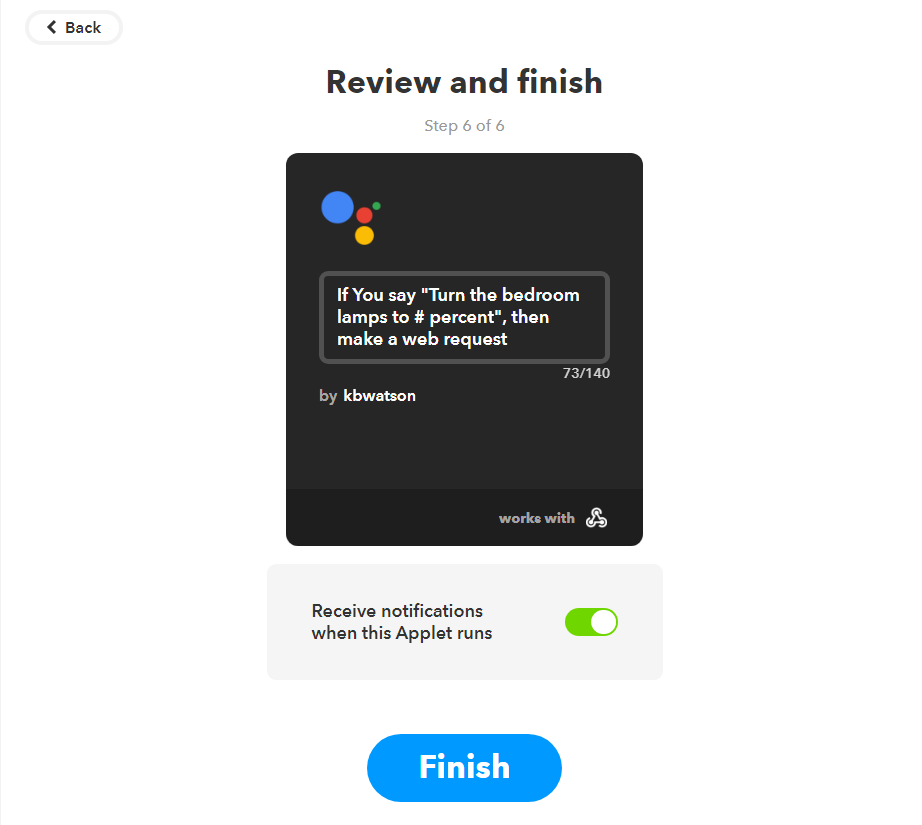
Here is where the bulk of our previous work comes into play:
- URL:
- http://static_IP_or_DNS
- the externally facing address
- :8123
- the externally opened port that is directed at your HA instance
- /api/services/input_number/set_value
- the service that we want to call
- ?api_password=Welcome
- the password that is defined in secrets.yaml
- http://static_IP_or_DNS
- Method: Post
- Content type: application/json
- Body:
- {“entity_id”:”input_number.lamp_brightness”,”value”:
- {{NumberField}}
- either type this in or click “Ingredients” and select “NumberField”
- }
- close off the curly bracket

Do a quick double check and hit “Finish”
That’s it! Within a few minutes you should be able to say “Hey Google, bedroom lamps 50 percent” and if they aren’t already on, they’ll come on at 50% brightness. If they are already on, they’ll just get smoothly adjusted to 50%.