So right now, the Home Assistant Dashboard is interactive via the touch screen, but beyond that it just shows a page and nothing else. I have a few things in mind that could be added to this, but I think I’m going to need to break it into two posts; software enhancements and hardware enhancements. The software enhancements will lay the ground work for some added hardware features, but will not be completely useless on their own.
Software Enhancements
As I said, this dashboard as it currently stands is a great window into what’s happening in Home Assistant. Full stop. It doesn’t do anything that a smart phone or computer can’t already do, it’s just an always on, front and center dashboard. The Raspberry Pi, especially the 3 that I used for this, is much more capable than just displaying a web page. To make use of this power, we need a way of communicating between the dashboard and HA. MQTT is perfect for this, it’s a light weight easy to use communication protocol that works across your network. If you don’t already have an MQTT server, I’ve got good and bad news. Bad news, I don’t have a write-up on setting up an MQTT server. This is mostly because I have mine running in a docker container which takes seconds to set up, assuming you already have a docker server; deeper goes the rabbit hole. The good news is that there are a multitude of good tutorials out there for setting up an MQTT server. You could even dual purpose this dashboard as an MQTT server, but that’s where I’ll leave this topic for now.
Once you have a server set up, you need to install the python library paho-mqtt on the Pi. This lets us subscribe to and publish to different topics on your server. For instance, we’re setting up a topic call “ha/ha-dashboard”. Another project I’m working on (and a future post) uses the topic “ha/home-alert”. If we subscribe to “ha”, we’ll see whatever the dashboard sees, as well as whatever is being sent on the other project. If we subscribe to a more specific topic like “ha/ha-dashboard”, we’ll only see traffic related to the dashboard.
pip3 install paho-mqtt
With this library, you can download a script I wrote from my Gitlab page here. Make sure you download the ha-dashboard.py and the config.py files. The easiest way to do this would be to make a copy using git.
- Make a folder called ha-dashboard in your Pi’s default folder.
/home/pi/ha-dashboard
- CD into the folder and Initialize a git repo
cd ha-dashboardgit init
- set up the remote
git remote add origin https://gitlab.com/cattux/ha-dashboard/
- set up your user name and email
git config --global user.name "YOUR NAME"git config --global user.email "YOUR@EMAIL.COM"
- pull the files from the remote
git pull origin master
Within the config.ya file, update the broker address with the IP address of your MQTT server, as well as whatever name you want associated with your dashboard.
You can run the script by entering the following:
python3 /home/pi/ha-dashboard/ha-dashboard.py
If it worked, you could get prompts as the script starts trying to connect to your server and once it’s connected and subscribed to the “ha/ha-dashboard” topic. Feel free to change this topic in the script. Now that I think about it, that really should live in the config.ya file. So if you’re following along and that’s where it is, I guess I made the change.
If you don’t already have MQTT set up in Home Assistant, all it takes the adding the following to your configuration.yaml file:
mqtt:
broker: <Broker IP Address>
After that, you can start directly interacting with MQTT devices from the HA interface:
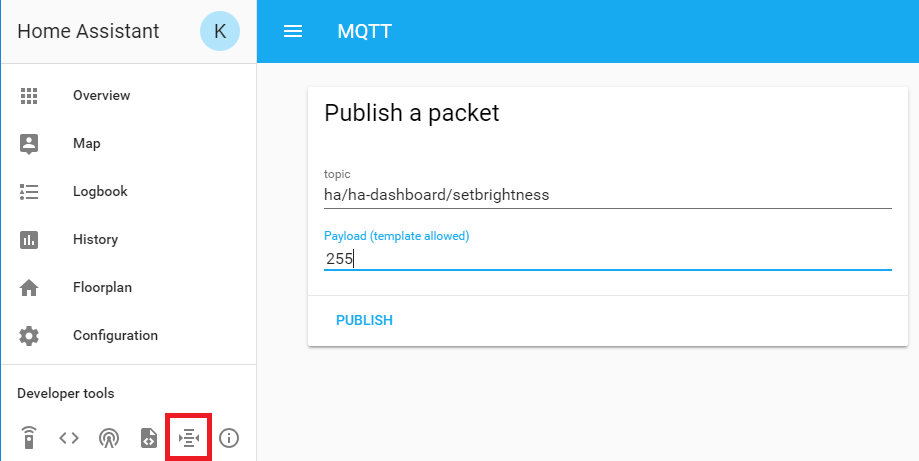
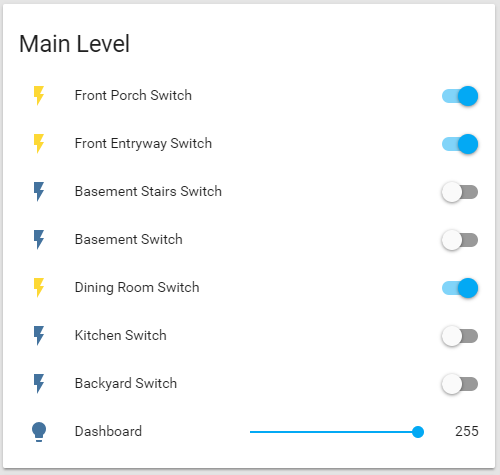
The GUI is a really nice addition to HA, but it’s not an ideal way to interact with MQTT devices. Let’s start by adding a slider to control the brightness; this can be done in your configuration.yaml file:
input_number:
ha_dashboard_brightness:
name: Dashboard
initial: 0
min: 0
max: 255
step: 5
icon: mdi:lightbulb
That looks great, but doesn’t do anything on it’s own. We need to create an automation to tie the slider to an MQTT command:
########################################
# DASHBOARD LIGHT AUTOMATION #
########################################
- id: ha_dashboard_brightness_dimmer
alias: "Change Dashboard Brightness"
trigger:
platform: state
entity_id: input_number.ha_dashboard_brightness
action:
- service: mqtt.publish
data_template:
topic: "ha/ha-dashboard/setbrightness"
payload: '{{ states.input_number.ha_dashboard_brightness.state | int}}'
This creates an automation that is triggered anytime the slider is adjusted. When the trigger is activated, the action of sending out an MQTT command with the above topic and payload gets sent. Notice that this is a data_template payload, which means it can take the slider position as a variable to send along in the payload. This is a very powerful tool that takes a bit of getting used to, definitely worth playing with though.
So now when the slider is adjusted, the dashboard brightness changes nearly instantaneously.
There is one last automation that I want to walk through, mostly because I couldn’t find an example of someone else doing it. I created 4 automations to automatically adjust the brightness of the display based on the state of the sun and the state of the light in the entryway. I originally set them up to call out an MQTT command as the action, and this worked great to adjust the brightness, but it left a problem. When an MQTT command directly changes the brightness of the dashboard, the slider doesn’t update which leaves the two out of sync with one another.
This wouldn’t be the end of the world, but it bothered me enough to try to fix it. In the end, all I ended up doing was changing the action of the automations to change the position of the slider, rather than the brightness directly. It sounds kind of clunky, having an automation drive a change to an input slider which is turn adjusts the brightness through another automation, but it works really well.
# If the sunsets while the entryway light is off, dim the dashboard
- id: dashboard_automation_min_brightness_sunset
alias: "Dashboard minimum brightness sunset"
initial_state: True
hide_entity: False
trigger:
- platform: sun
event: sunset
condition:
- condition: state
entity_id: switch.front_entryway_switch
state: "off"
action:
- service: input_number.set_value
data:
entity_id: input_number.ha_dashboard_brightness
value: 15
# If the entryway light is turned off after sunset, dim the dashboard
- id: dashboard_automation_min_brightness_entryway
alias: "Dashboard minimum brightness entryway"
initial_state: True
hide_entity: False
trigger:
- platform: state
entity_id: switch.front_entryway_switch
from: "on"
to: "off"
condition:
- condition: sun
after: sunset
action:
- service: input_number.set_value
data:
entity_id: input_number.ha_dashboard_brightness
value: 15
These are two of my 4 automations that control the brightness of the dashboard, not including the slider. These set the brightness after sunset, the other two take care of it after sunrise, they’re very similar though. Basically if the entryway light is on, even after dark the dashboard brightness will stay at full brightness. When the entryway light is turned off, the dashboard dims since the room is now dark. It’s pretty simple, and the result is great; no more being blinded by the dashboard when I’m walking downstairs with the lights off to get a late night snack! 🙂
Frankket